Using Download Director
Download Director is a Java application that provides enhanced download capability to IBM customers who download our products from the internet. It provides high-performance, reliable downloads with pause and resume capability. It starts in a separate browser window and provides a graphical user interface (GUI) to specify the download location, and view download status.
Download Director is started from your web browser by clicking buttons or links on a web page that is set up to use Download Director.
Using Download Director for the First Time
If your browser does not support Java applets, Download Director will start installing a small application on your workstation. Follow the steps on the installation instruction page. The installation JNLP file should be launched using Java Web Start.
If your browser supports Java applets, Download Director will run as a Java applet within your browser as described below.
The first time that you use Download Director, two windows are displayed: a Java security window and the Download Director applet window. You need to perform these three steps to start the download:
1. Grant the applet privileges from the Java Security window
When the applet is loaded in the web browser, you are prompted to grant the applet some additional privileges so that it can successfully execute. If these privileges are not granted, the applet will not run. These privileges are required for Download Director to connect to the remote server and to read and write local files.
When the Download Director applet loads, a Java Security Warning window is displayed asking if you want to run the applet. This applet is signed and distributed by IBM.
If you're using the Java Plug-in ...
Click Yes to run the applet. The applet will then have the necessary permission to perform the download. Click Always if you do not want this Security Warning window displayed every time that you use Download Director.
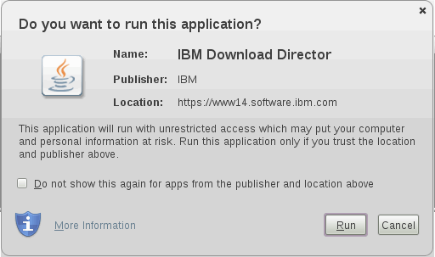
Click Run to run the applet. The applet will then have the necessary permission to perform the download.
You may check the Do not show this again for apps from the publisher and location above checkbox if you do not want this security window displayed every time that you use Download Director.
2. Select a download directory
The first time you use Download Director, the Initial Setup window appears. When you specify the default download location, a profile will be stored there that keeps your settings.
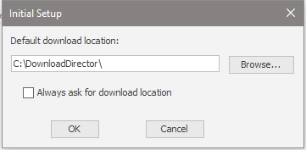
From the Initial Setup window:
- Enter the drive and directory name where you want to store the downloaded file. This directory will be created if it does not already exist. Click the Browse button to navigate to and select the desired drive and directory.
- Select the Always ask for download location checkbox if you would like to prompted for a download location for each downloaded file. If you don't select the checkbox, all files will be downloaded to the default directory entered above. If you need to change the target directory, you can set a new one later by clicking the Setup button.
- Click OK to continue.
3. Set the proxy server (optional)
The first time you use Download Director, you are asked if you would like to configure the proxy settings.
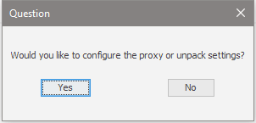
If you click No, Download Director attempts to download the files using a direct connection. If you click Yes, the Setup window is displayed.
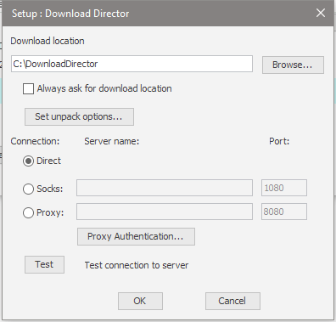
To set a proxy server, from the Setup window:
- Choose the type of connection (firewall type), enter the server name and the port number.
- Click the Test button to check the server connection. An information window is displayed to indicate if the connection was successful. If the connection is refused, reenter the correct settings and click OK.
Contact your network or server administrator if you do not know how to configure these settings. Correct information must be specified to successfully download files using Download Director.
Download Director Main Window
This is the main Download Director applet window. It is displayed when the download begins and shows information about the file being downloaded and the download progress. From this window, you can pause, resume or cancel the download and access the settings and details dialogs.
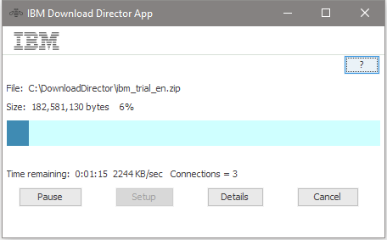
- The ? button shows information about the Download Director features.
- The Pause button provides these functions during and after a download:
- Pause is displayed during a download. Click it to pause the download.
- Resume is displayed when a download is paused. Click it to resume the download.
- Retry is displayed when a connect or download error occurs. Click it to retry the download.
- Unpack is displayed when a download is complete and the file can be unpacked. Click it to unpack the file.
- Launch is displayed when a download is complete for a Windows executable. Click it to run the downloaded file on your workstation.
- Click the Setup button to show the Setup window.
- Click the Details button to show the Details window.
- Click the Cancel button to cancel the current download.
Click the Setup button, to show the Setup window. This lets you to configure your Download Director settings.

- Download location lets you to specify the default directory to store downloaded files. You can have Download Director always prompt you for a location by selecting the Always ask for download location checkbox. These changes will take effect during the next download.
- Click Set unpack options to view the Unpack Settings Window.
- The Connection settings let you to perform downloads through firewalls such as socks or proxy servers. See your server or network administrator for the appropriate settings for your environment. After these are set, you can test your connection to the download server by clicking the Test button. An information window is displayed to indicate if the connection was successful.
- Click OK to save your settings and close the window.
Click the Set unpack options button in the Setup window, to show the Unpack options window. This lets you to configure your unpack settings for files of these types (.zip) (.tar) (.gz) (.tar.gz)
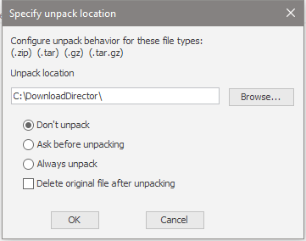
- Unpack location lets you to specify the default directory to unpack files to.
- The radio buttons let you to specify how to unpack files when the download completes:
- Don't unpack disables file unpack.
- Ask before unpacking lets you choose whether to unpack or not.
- Always unpack automatically unpacks files.
- Check Delete after unpacking if you want the original file deleted after it is successfully unpacked.
- Click OK to save your settings and close the window.
When you click the Details button, a Details window is displayed to show you information about current or previous downloads. A ">" is displayed next to the file that is currently downloading.
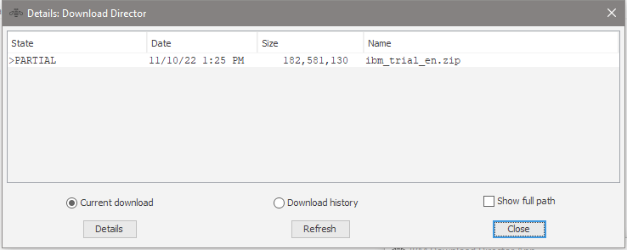
- Click Current download to view the current downloads.
- Click Download history to view files that have been downloaded previously.
- Click Show full path to view each file's download location.
- Select a file and click the Details button to view information about the file in the File Details window. If a file group item is selected, a list of files in that file group is displayed.
- Click the Refresh button to refresh the file list.
- Click Close to close the window.
When you click the Details button, the File Details window is displayed to show you information about the selected file.
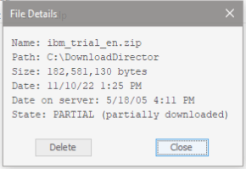
- Click the Delete button to delete the file. This button is only visible if the file exists on the filesystem.
- Click the Unpack button to show the Unpack window. This button is only visible if the file can be unpacked.
- Click Close to close the window.